UI and Configuration Options
AI Tab 
This is the main/default tab.
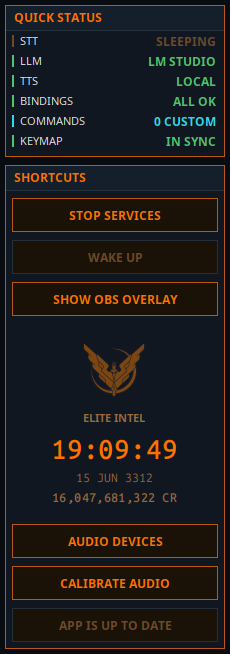 |
- Start / Stop Services: Toggles the AI stack on/off. - Wake/Sleep: In wake mode app listens all the time, in Sleep mode app will ignore input unless PTT button pressed, "Listen" bypass word is used or "Wake up!" command issued. - OBS Overlay: Displays a black overlay window with Commander / AI interraction. Add to OBS, key-off black background - Audio Devices: Select audio device for input/output- Calibrate Audio: Run Audio Calibration for better performance. |
Player Tab 
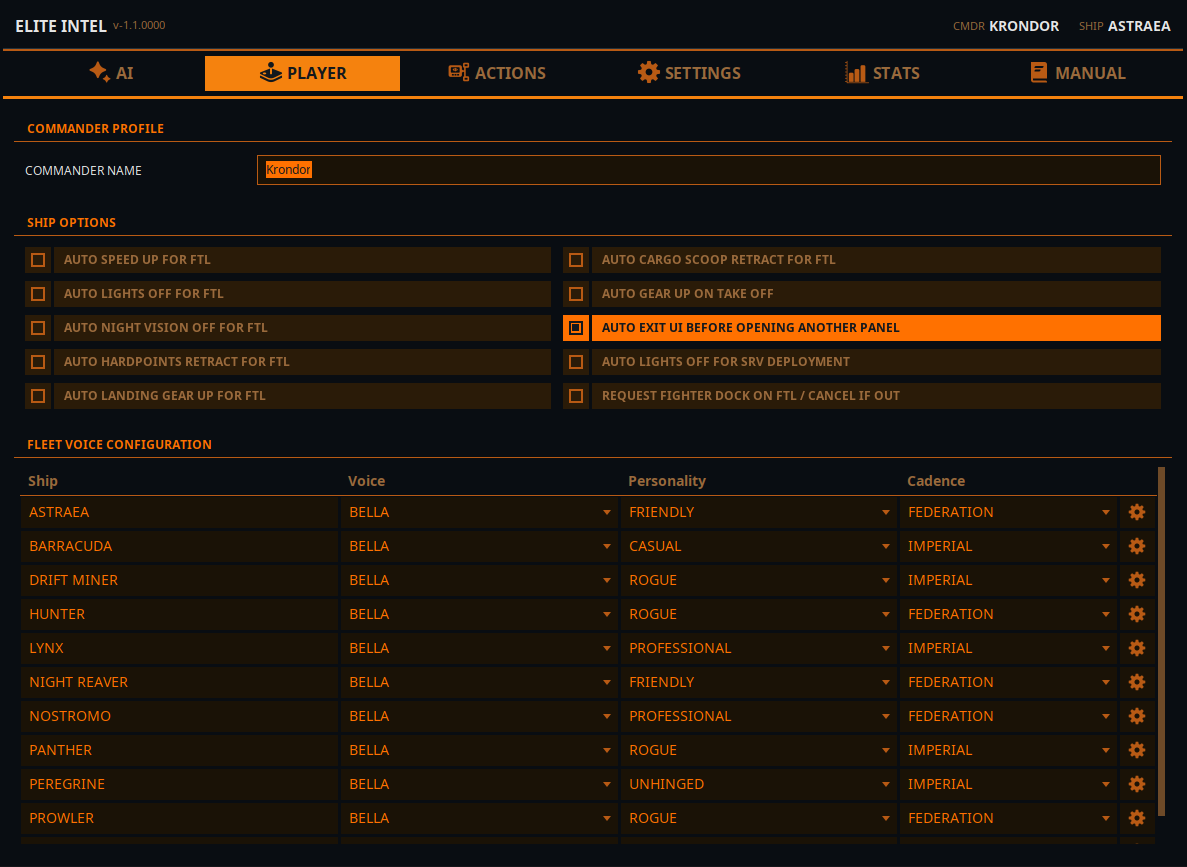
- Commander Name: Use this field to override your in-game name for Text-to-Speech.
- Ship Options: You can toggle these automations on and off. Useful for commanders with disabilities
- Fleet Management: Assign voices, personalities, and cadence to individual ships. Personality only works with cloud LLMs. The gear icon opens up ship's proeperties such as auto-honk and trade profile"
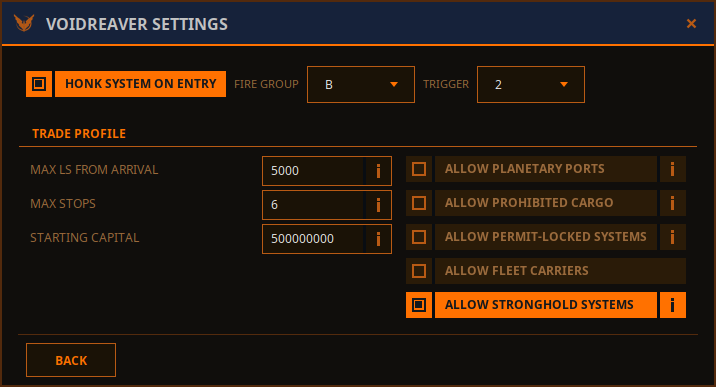
- Honk System On Entry: Select fire group and trigger. If this option is checked the ship will perform discovery scan on entry. If your HUD is in Combat mode, it will swap to Analysis, perform the scan and swap back.
- Customize your trade profile: These parameters can be set on the user interface, or via voise commands: "alter/change trade profile set [parameter] to [value]"
Actions Tab 
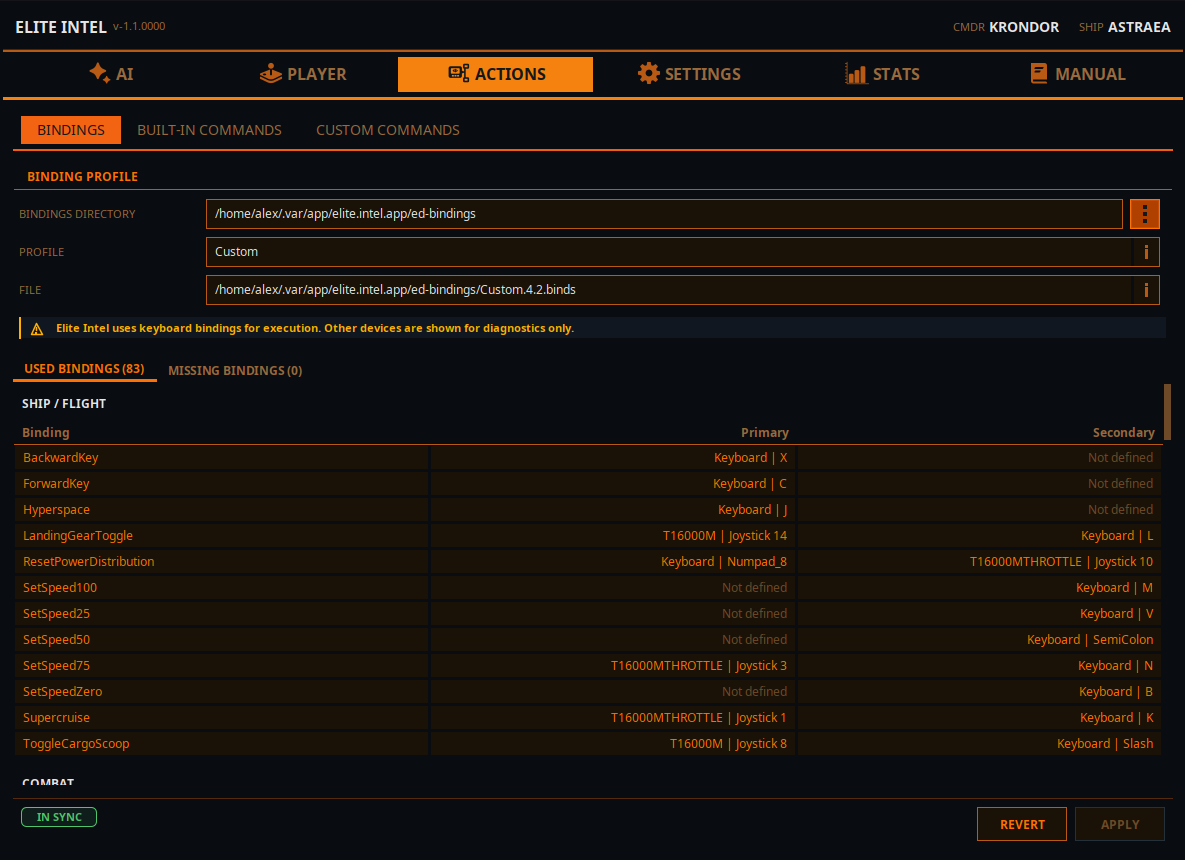
Actions / Bindings tab has three sections. Bindings, Built-in Commands and Custom commands.
- Bindings directory is where you game bindigs file located. Without it the app can't operate in game controls
- Profile is your current in-game bindings profile.
- File is the file that contains the bindings you are currently using
You can modify your bindigs using this screen and save it as a new profile.
NOTE- HOTAS/CONTROLLERS are displayed but cannot be set through this screen. Keboard binds only (subject to change in the future)
Actions / Built-In Commands
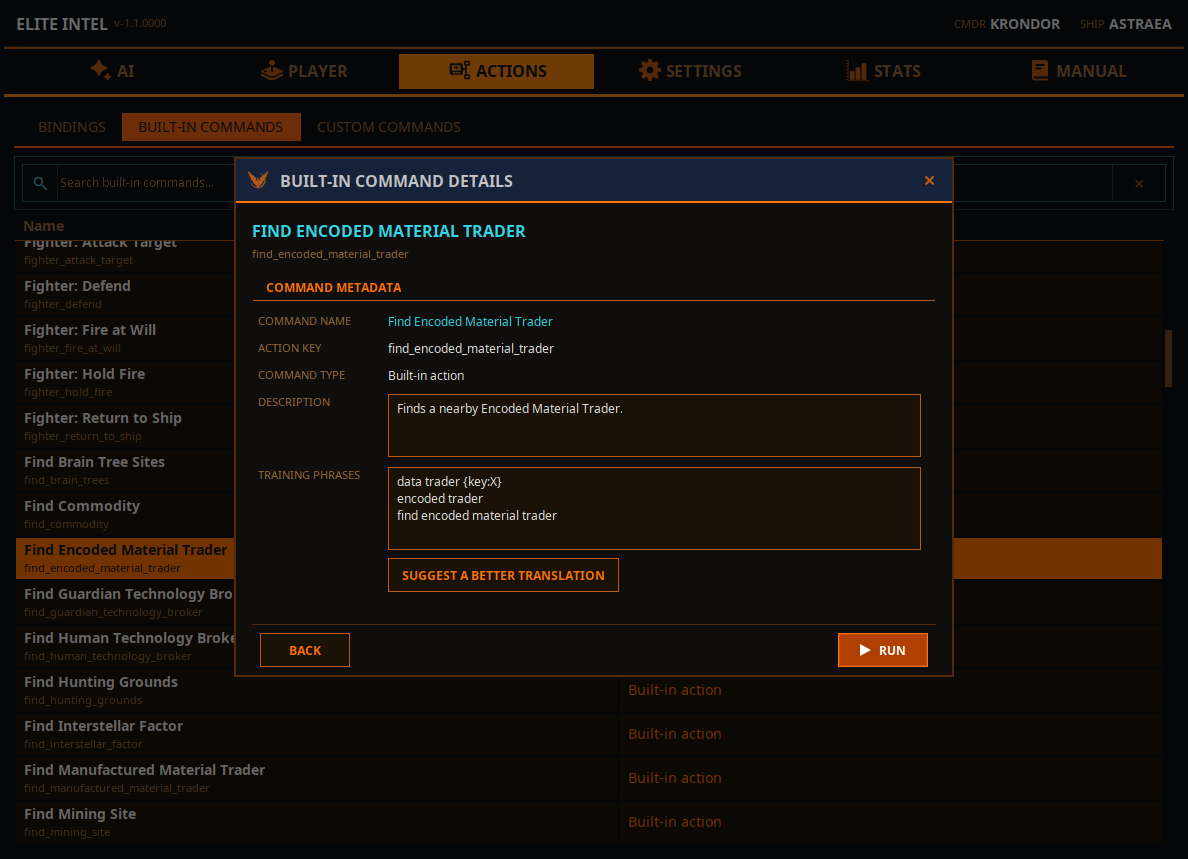
Provides a list of built-in commands. Double-clicking on one will show a dialog box with information about the command and allow you to propose a better translation for localization.
Settings / Local LLM Tab 
- Set the address of your inference server. Defaults to
localhostwith the Ollama URL. - Provide the names of the models to use. See the Local LLM guide.
- LLM host radio buttons: Select between Ollama and LM Studio.
- Use checkbox: Enable to use the local model instead of the cloud.
Settings / Audio 
- Speech Volume: Controls the volume of speech synthesis.
- TTS Voice Speed: Controls the speed of speech synthesis.
- Beep Volume: Controls the volume of the beep indicator. Indicates that STT has finished processing and the LLM has received input.
- STT Threads: Sets the thread allocation for STT processing. This is a min/max setting. The app requests the minimum but uses what the processor provides. Threads are released after processing completes.
- Use Local Text To Speech: Overrides the cloud TTS key and uses local TTS.
- Audio Wave Visualizer: Displays a dynamic graph of the audio input. Shows the noise floor, audio signal, gate zones, and clipping if present.
Settings / Cloud LLM Tab 
- Cloud LLM Key: Enter your API key. Supported providers: Gemini, OpenAI, Grok, Mistral, Deepseek, and Anthropic/Claude.
- Cloud TTS Key: Enter your API key. Supported provider: Google.
- Note: Uncheck the "Use" checkbox in Local LLM. It overrides the cloud LLM key.
LLM (AI Brain)
Cloud option: Enter your API key for Mistral, xAI, OpenAI, or Anthropic/Claude. The app uses a fixed model per provider:
- Mistral: 'mistral-small-2506' (Free with hourly limit)
- xAI:
grok-4-1-fast-non-reasoning - OpenAI:
gpt-4.1-mini(commands) /gpt-5.2(queries) - Gemini Generative Language API:
gemini-3.1-flash-lite-previewfor commands and queries - Anthropic/Claude
Local option: Leave the key blank, fill in the local LLM fields below, and check ☑ Use next to the local LLM. See Local LLM guide (Linux) / Local LLM guide (Windows).
- LLM Address: defaults to
localhost. Replace with the IP of another PC if Ollama runs on a separate machine. - Command LLM: handles voice command interpretation.
- Query LLM: handles data analysis.
tulu3:8bis the minimum. Larger models produce better results.
No local hardware? Use a cloud LLM.
Cost will be different depending on which Cloud service you choose, and how long you play.
FREE CLOUD Option: Mistral
- Go to Mistral Console
- Create account with a valid email you can verify.
- NO CREDIT CARD NECESSARY
- Create a "Organisation" (Call it whatever you want. For example "Elite Intel")
- Generate an API key. Enter that key in to the app and restart the app.
Option A: xAI API Key
- Go to the xAI Console.
- Sign up or log in.
- Navigate to the API section and generate a new API key.
- Add credits to your account.
- Paste the key into the LLM field and check the lock box.
Option B: OpenAI API Key
- Go to the OpenAI Platform.
- Sign up or log in.
- Navigate to the API section and generate a new API key.
- Paste the key into the LLM field and check the lock box.
Option C: Anthropic/Claude API Key
- Go to the Claude Platform.
- Sign in with email or Google. Note: authentication uses a magic link sent to your email.
- Go to Settings → Billing and add credits before creating a key. A key created on an unfunded account does not function even if credits are added afterward.
- Go to API Keys and create a key.
- Paste it into the LLM field, check the lock box, and start or restart services on the AI tab.
Getting a Google TTS Key (14 voices)
- Go to the Google Cloud Console.
- Sign in or create an account.
- Create a new project.
- Enable the Generative Language API for LLM and/or Cloud Text-to-Speech API for TTS.
- Go to Credentials, create an API key, and copy it.
- Restrict the key: Click the key you just created. On the key detail page, click Restrict key. A dropdown appears. Check each API you enabled (STT and/or TTS), then click Save.
- Paste the key into the Speech to Text and/or Text to Speech fields in the app. Check the lock boxes.
App Settings and Data Directory
App settings and data are stored in a SQLite database located at:
- Linux:
~/.local/share/elite-intel/elite-intel/db/ - Windows:
%APPDATA%\elite-intel\db\
For issues, contact via Matrix. Bug reports and pull requests are welcome.
Community 👉Matrix👈